The allure of a freshly styled hairdo from a professional salon is undeniable. The sleek finish, the perfect curls, the voluminous bounce – it’s a feeling of confidence and polish that many of us crave. However, regular salon visits can be costly and time-consuming. The good news? Achieving stunning, salon-worthy hairstyles from the comfort of your own home is not only possible but also incredibly empowering. With the right knowledge, tools, and a bit of practice, you can transform your everyday look, experiment with new styles, and maintain healthy, beautiful hair without breaking the bank.
This comprehensive guide will walk you through everything you need to know about how to do hairstyle at home, from preparing your hair and understanding essential tools to mastering basic techniques and creating popular styles. Get ready to unleash your inner hairstylist and embrace a world of endless hair possibilities!
The Foundation: Hair Care & Preparation
Before you even think about styling, the health and cleanliness of your hair are paramount. A great hairstyle starts with a great foundation.
1. Understand Your Hair Type:
Knowing your hair type is crucial for selecting the right products and techniques.
- Straight: Prone to oiliness, can be difficult to hold curls.
- Wavy: Tends to frizz, can hold a curl or be straightened.
- Curly: Prone to dryness and frizz, requires specific moisturizing products.
- Coily: Very dry, delicate, shrinks significantly.
- Fine: Lacks volume, can be easily weighed down.
- Thick: Can be heavy, takes longer to dry and style.
2. Washing & Conditioning:
Clean hair is the best canvas.
- Shampoo: Choose a shampoo formulated for your hair type (volumizing, moisturizing, color-safe, etc.). Focus on cleansing the scalp.
- Conditioner: Apply conditioner primarily to the mid-lengths and ends, avoiding the roots if your hair is prone to oiliness. It helps to detangle, smooth, and add shine.
- Rinsing: Rinse thoroughly with cool water to seal the cuticles and enhance shine.
3. Pre-Styling Products: Your Hair’s Best Friends:
These products protect your hair and prepare it for styling, ensuring longevity and better results.
- Heat Protectant: Non-negotiable if you use heat tools. It forms a barrier that minimizes damage from high temperatures. Apply generously to damp hair.
- Mousse/Volumizer: Ideal for fine or flat hair. Apply at the roots for lift and throughout for body.
- Smoothing Serum/Leave-in Conditioner: Perfect for frizzy or coarse hair. Helps to tame flyaways, add shine, and provide moisture.
- Root Lifter: Sprays or foams specifically designed to give volume directly at the roots.
4. Drying Techniques:
How you dry your hair significantly impacts your final style.
- Towel Drying: Gently squeeze excess water with a microfiber towel. Avoid vigorous rubbing, which can cause frizz and damage.
- Air Drying: Great for hair health, especially for wavy or curly textures. Apply your styling products and let nature do the rest.
- Blow Drying: For most styles, a good blow-dry is essential.
- Rough Dry: First, rough dry your hair until it’s about 70-80% dry. This saves time and reduces heat exposure.
- Sectioning: Divide your hair into manageable sections (top, sides, back) using clips.
- Nozzle Use: Always use the concentrator nozzle on your blow dryer. It directs airflow, preventing frizz and making styling more efficient.
- Direction: Point the nozzle downwards, following the direction of your brush, to smooth the hair cuticle and enhance shine.
- Cold Shot: Finish each section with a blast of cool air to set the style and add shine.
Essential Tools & Products
Having the right tools is half the battle when learning how to do hairstyle at home.
1. Brushes & Combs:
- Wide-Tooth Comb: Best for detangling wet hair gently.
- Paddle Brush: Ideal for smoothing and detangling dry hair, great for straight styles.
- Round Brush: Used with a blow dryer to add volume, create waves, or straighten. Different sizes yield different results (smaller for tighter curls, larger for volume/straightening).
- Vent Brush: Allows air to pass through, speeding up drying time.
2. Heat Styling Tools:
- Blow Dryer: Invest in a good quality one with multiple heat and speed settings.
- Flat Iron (Straightener): Choose ceramic or tourmaline plates for even heat distribution and less damage. Sizes vary for different hair lengths.
- Curling Iron/Wand:
- Curling Iron: Has a clamp to hold the hair. Different barrel sizes create different curl types (smaller for tighter curls, larger for loose waves).
- Curling Wand: No clamp, you wrap the hair around the barrel. Often creates more natural-looking waves.
- Heat Protection Mat/Gloves: Essential for safety.
3. Accessories:
- Hair Ties/Elastics: Seamless ones prevent breakage.
- Bobby Pins: Indispensable for securing updos, braids, and stray strands.
- Hair Clips (Duckbill/Sectioning Clips): Crucial for sectioning hair while styling.
- Headbands/Scarves: Great for adding flair or disguising a bad hair day.
4. Finishing Products:
- Hairspray: Comes in various holds (light, medium, strong). Use to set your style.
- Shine Spray: Adds a glossy finish without weighing hair down.
- Dry Shampoo: Extends the life of your style by absorbing oil, and can also add volume.
- Texturizing Spray: Adds grit and volume, perfect for beachy waves or messy updos.
Mastering Basic Techniques
Before attempting complex styles, get comfortable with these fundamental techniques.
1. Sectioning Hair:
This is perhaps the most critical step for any precise styling. Use clips to divide your hair into manageable sections (e.g., top, crown, sides, nape). Working with smaller sections ensures even heat distribution and better results.
2. Blow Drying for Volume or Smoothness:
- For Volume: After applying root lifter, use a round brush. Lift sections of hair straight up from the scalp and direct the blow dryer at the roots, using tension with the brush. Roll the brush down through the ends.
- For Smoothness/Straightening: With a paddle or large round brush, pull sections taut and direct the blow dryer nozzle down the hair shaft from roots to ends. This smooths the cuticle for a sleek finish.
3. Straightening Hair with a Flat Iron:
- Preparation: Ensure hair is completely dry and apply heat protectant.
- Sectioning: Divide hair into 1-inch sections.
- Technique: Place the flat iron close to the roots, clamp down gently, and glide it slowly and smoothly down the hair shaft in one continuous motion. Avoid stopping or going over the same section multiple times, as this can cause damage.
4. Curling Hair with an Iron or Wand:
- Preparation: Ensure hair is completely dry and apply heat protectant.
- Sectioning: Work with 1-2 inch sections.
- Curling Iron: Clamp the hair near the ends, then roll the iron up towards the roots. Hold for 5-10 seconds (adjust based on heat setting and hair type), then release the clamp and gently pull the iron out.
- Curling Wand: Hold the wand vertically (or horizontally for different effects). Wrap a section of hair around the barrel, starting from the base and wrapping away from your face. Hold the end of the hair with your fingers (use a heat-protective glove!). Hold for 5-10 seconds, then release.
- Direction: For a natural look, alternate the direction of curls (some towards the face, some away). For a more uniform look, curl all sections in the same direction.
- Setting: Let curls cool completely before touching them to ensure they set. You can gently brush them out with a wide-tooth comb or your fingers for softer waves.
Popular & Easy Home Hairstyles
Now that you’ve mastered the basics, let’s explore some go-to styles you can create at home.
1. The Classic Ponytail:
Versatile and timeless, the ponytail can be sleek or messy.
- Sleek High Ponytail: Brush hair back tightly, securing with a strong elastic at the crown. Smooth any flyaways with a fine-tooth comb and a little hairspray or serum. Wrap a small section of hair around the elastic and secure with a bobby pin for a polished look.
- Messy Low Ponytail: Gather hair loosely at the nape of your neck. Pull out a few face-framing pieces. Secure with an elastic, then gently tug at the crown for added volume and a relaxed feel.
2. The Elegant Bun:
From sophisticated to casual, buns are always chic.
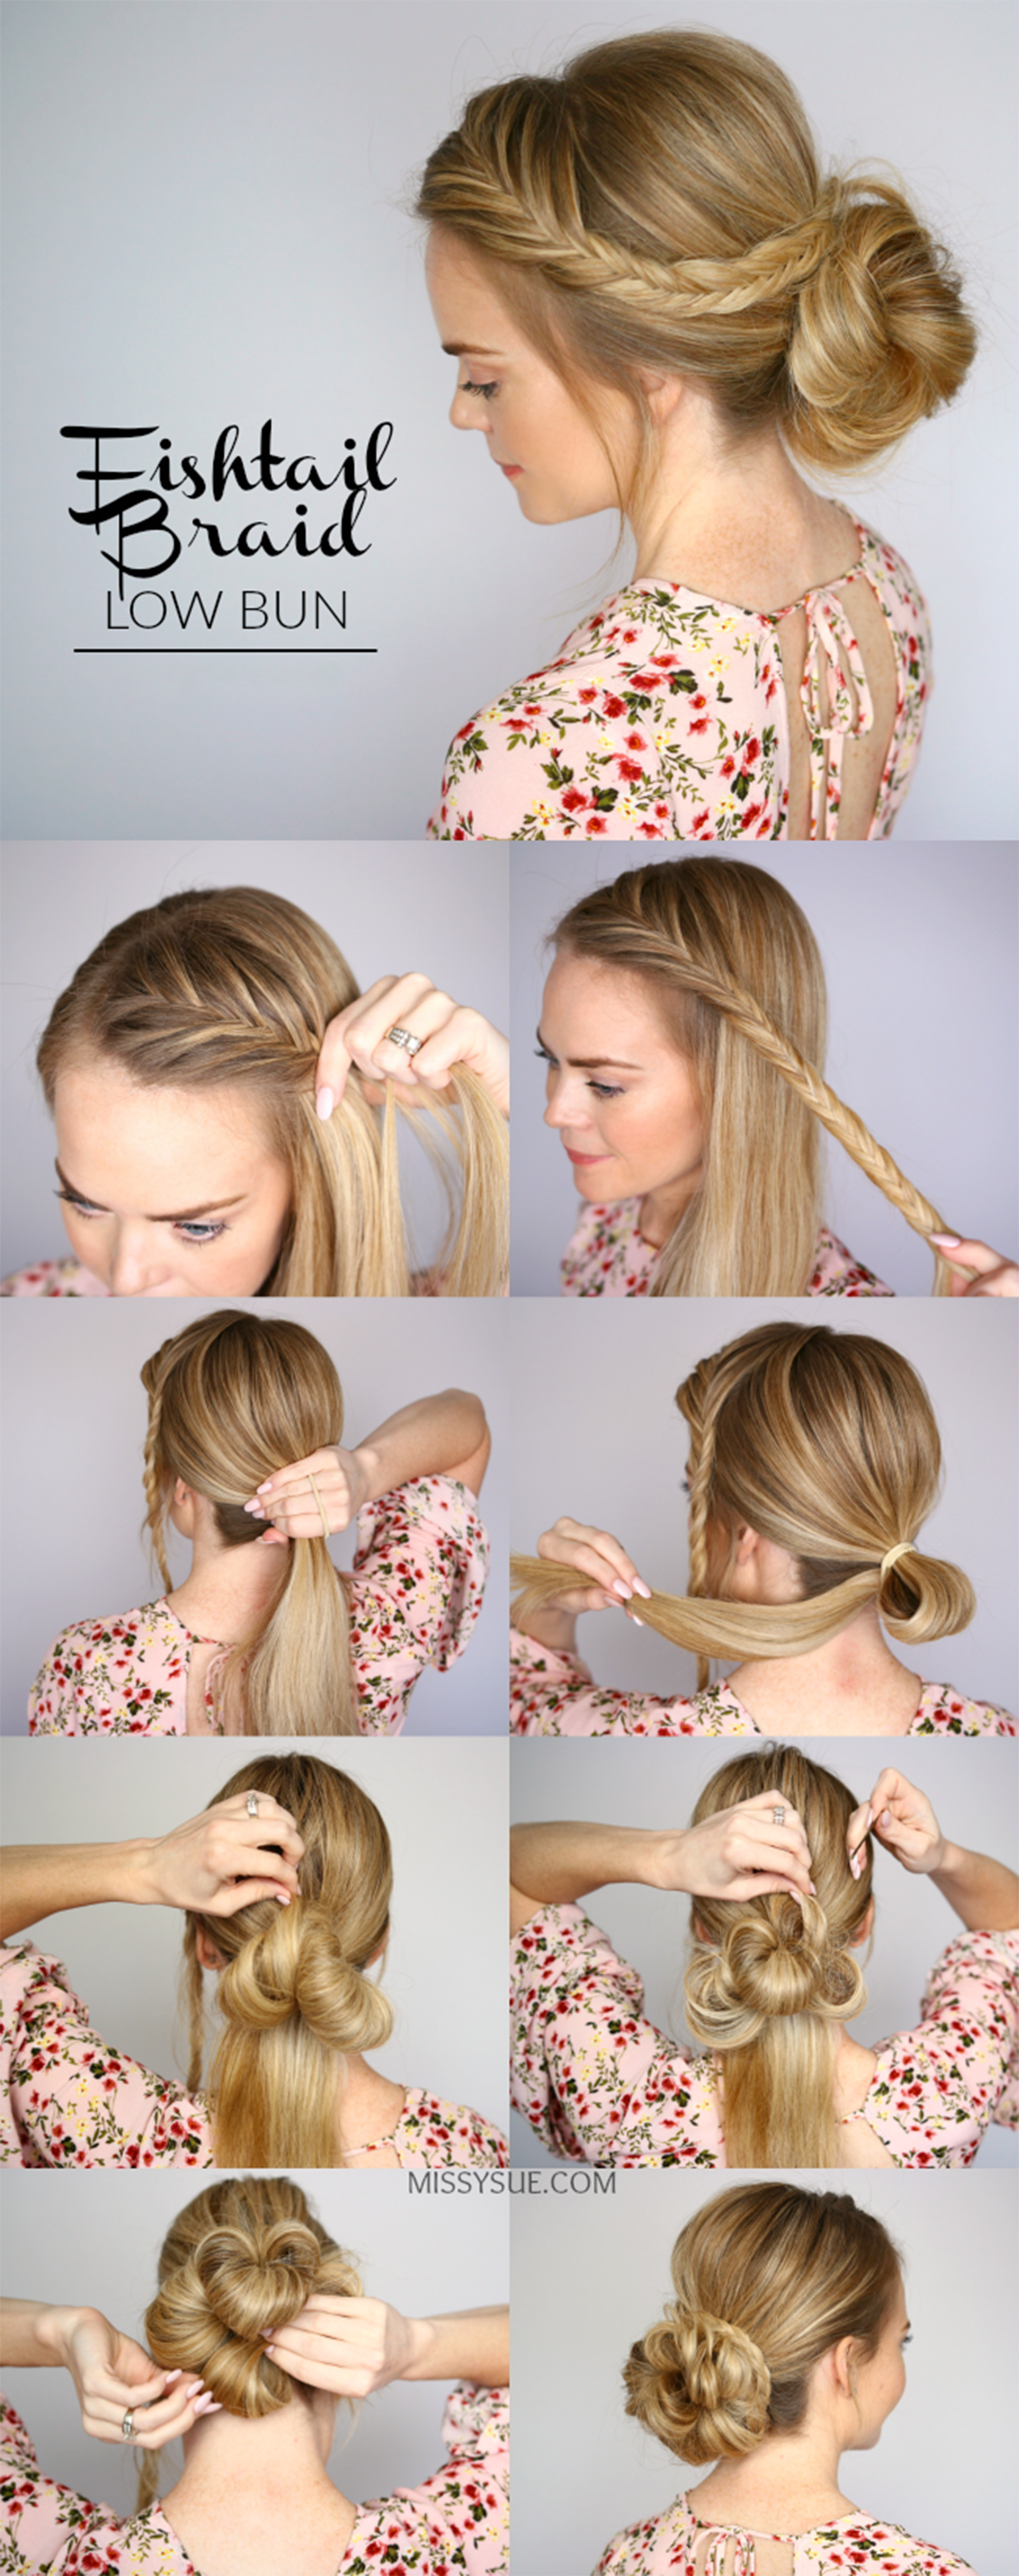
- Low Bun: Create a low ponytail. Twist the ponytail into a rope and coil it around the elastic. Secure with bobby pins.
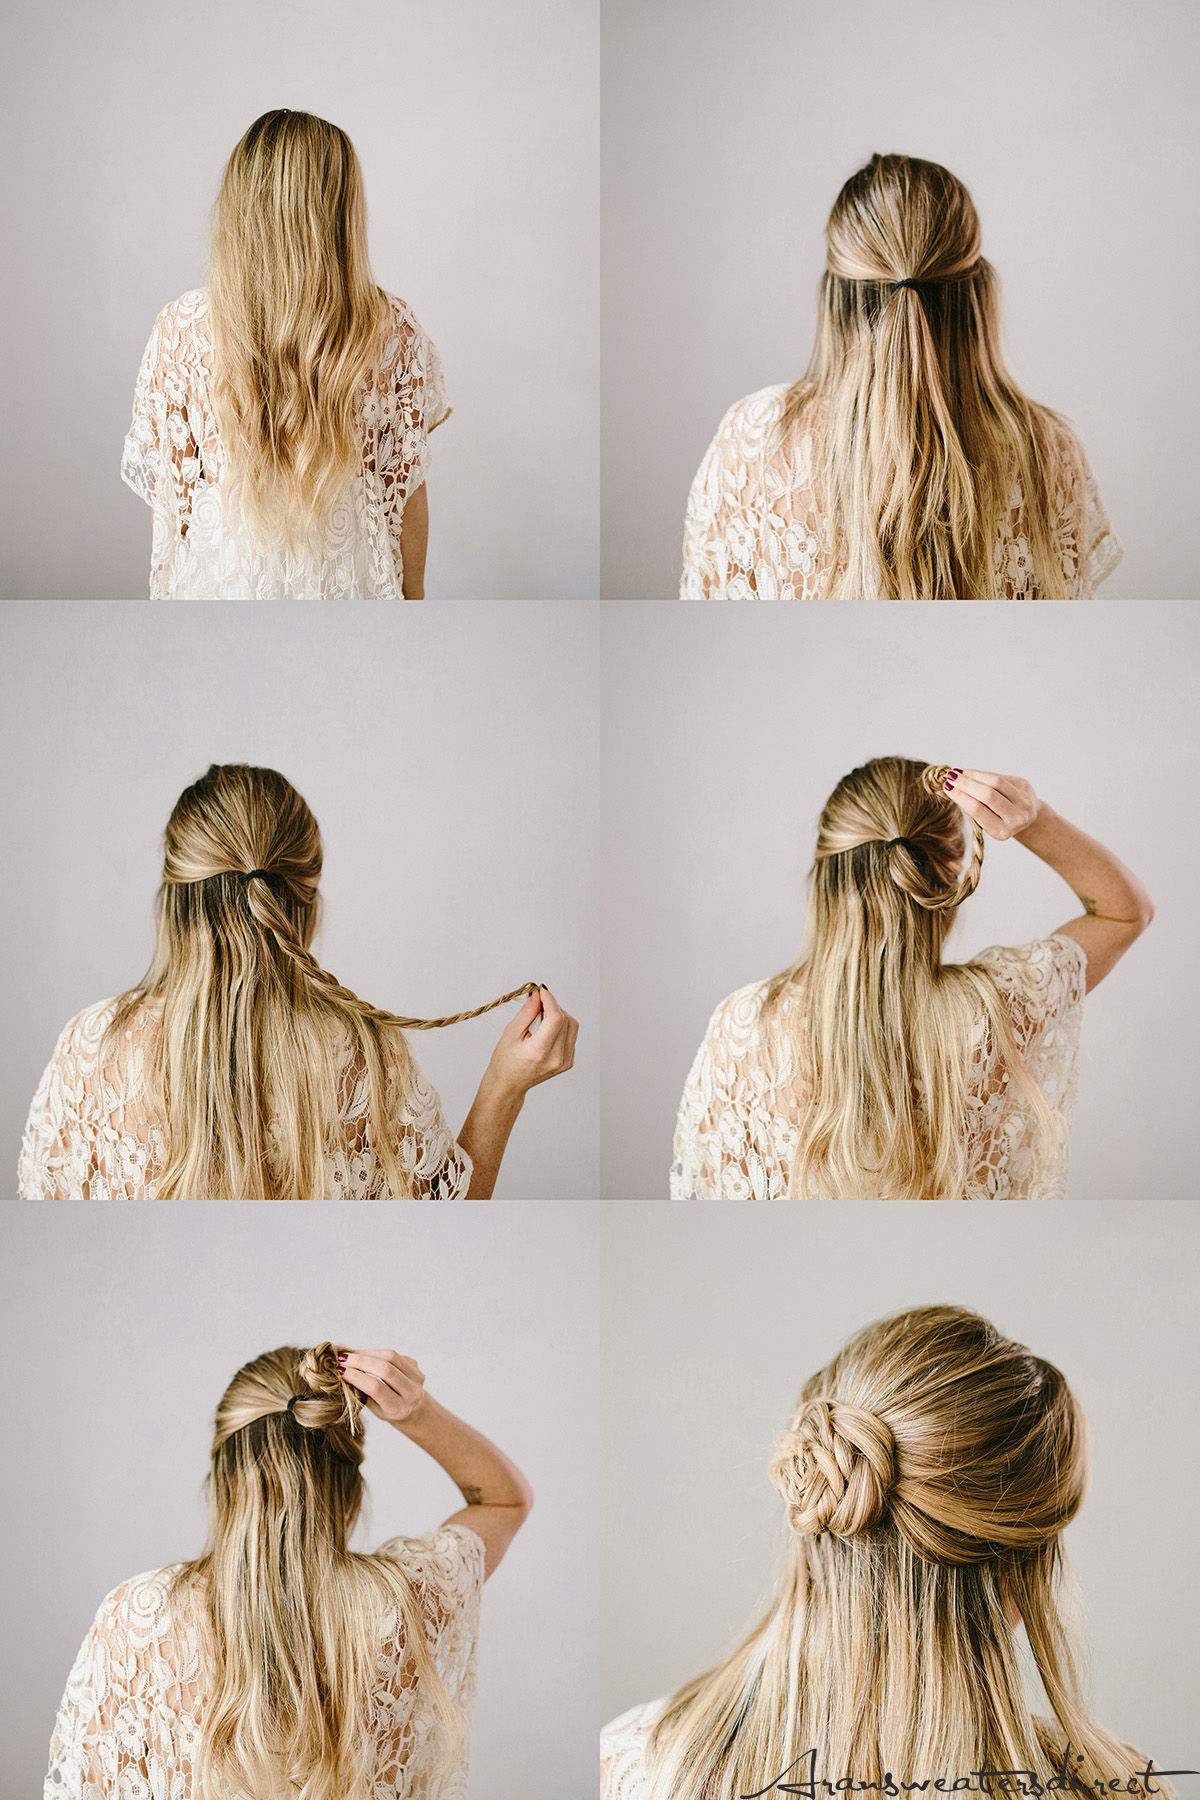
- Messy Bun/Top Knot: Gather hair into a high ponytail (for a top knot) or at the crown (for a messy bun). Twist the hair and loosely coil it, securing with an elastic and bobby pins. Don’t aim for perfection; let some strands fall out for a relaxed vibe.
- Sock Bun: For a fuller, neater bun, use a sock bun tool (a donut-shaped foam ring). Pull your ponytail through the center, spread your hair over the donut, and tuck the ends underneath, rolling the donut down to your head.
3. Waves (Heatless & Heat):
- Heatless Waves (Overnight):
- Braids: Braid damp hair (one or two French/Dutch braids for looser waves, multiple smaller braids for tighter waves) before bed. Undo in the morning for natural waves.
- Socks/Rollers: Wrap damp sections of hair around socks or soft rollers, securing them. Sleep on them and unroll in the morning.
- Heat Waves (Beach Waves):
- Flat Iron: Take 1-inch sections. Clamp the flat iron near the roots, rotate it 180 degrees, and pull it down a few inches. Rotate it back 180 degrees and pull down again, creating an S-bend. Repeat until the ends.
- Curling Iron/Wand: Use a larger barrel (1-1.5 inches). Wrap sections of hair away from your face, leaving the last inch or two of the ends out for a more undone look. After curling, gently pull on the ends of each curl while it’s still warm to stretch it into a wave. Finish with texturizing spray.
4. Half-Up, Half-Down:
A simple yet elegant style that keeps hair out of your face while showcasing length.
- Basic Half-Up: Take the top section of your hair (from temples to crown) and secure it with an elastic or clip at the back of your head.
- Braided Half-Up: Take two small sections from the front, braid them, and then bring them back to meet in the middle, securing with a bobby pin or elastic.
- Twisted Half-Up: Twist two front sections of hair away from your face and bring them back to meet.
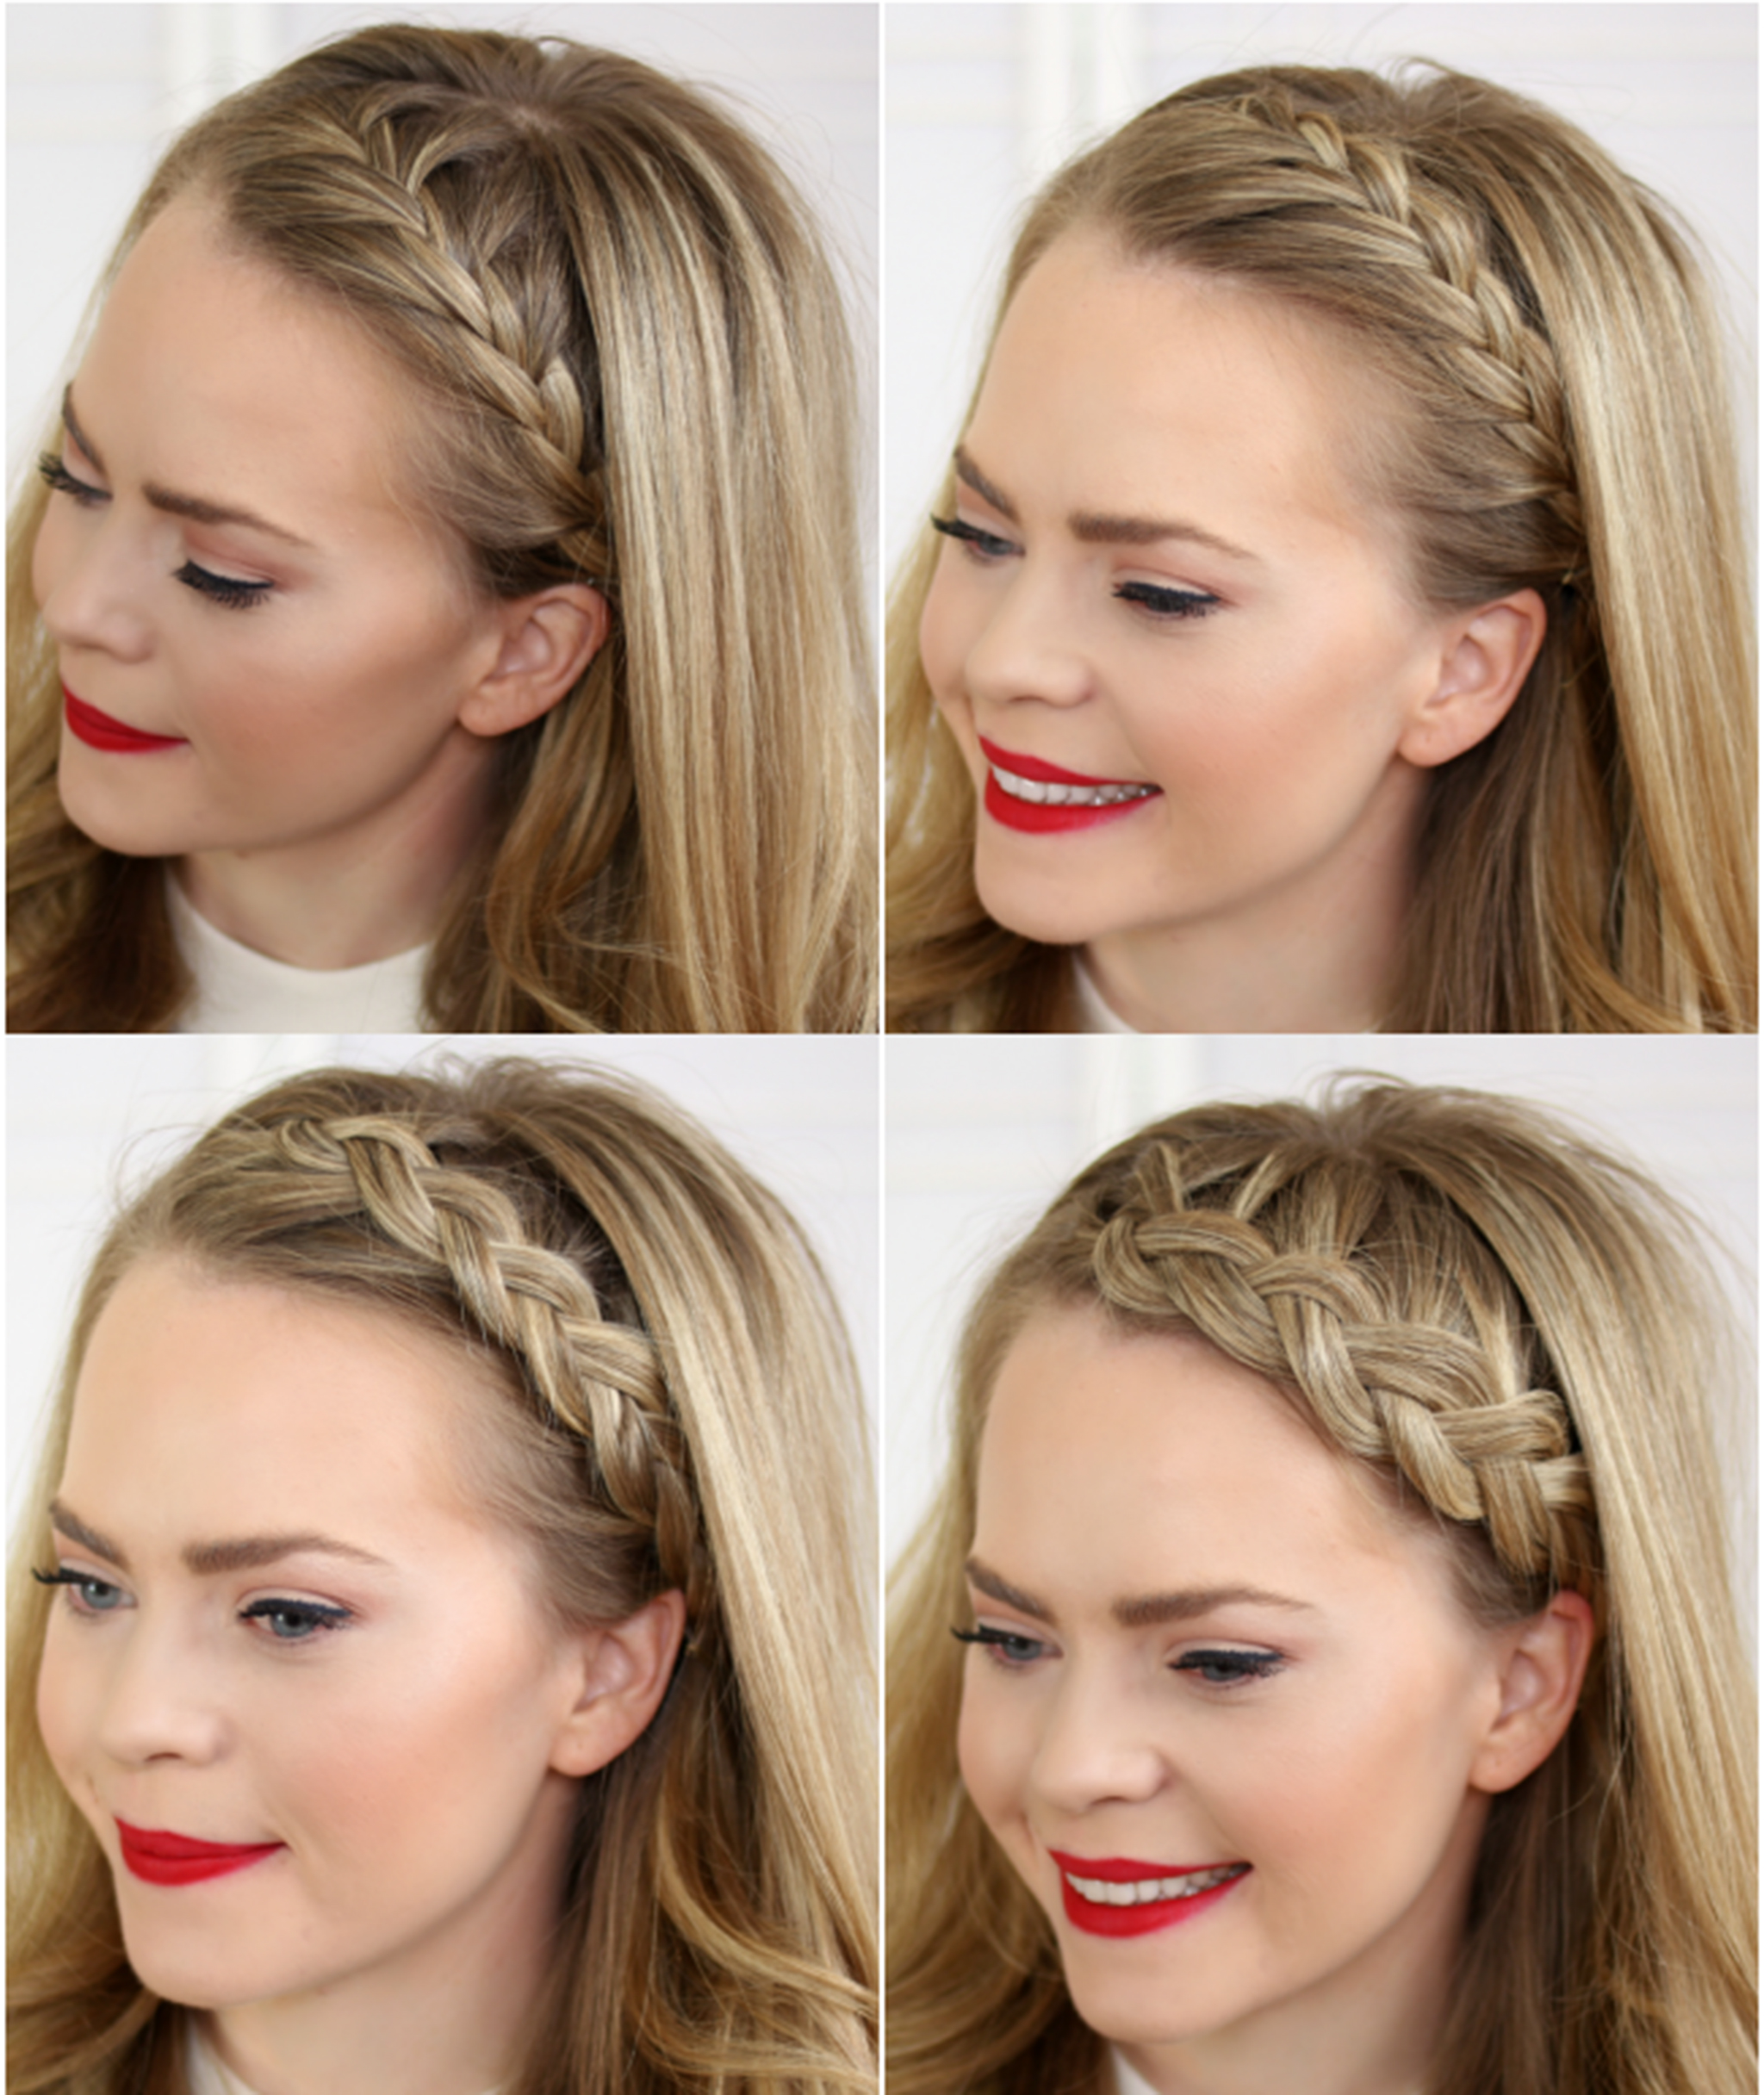
5. Braids:
Braids can seem intimidating, but mastering a few basic types opens up many possibilities.
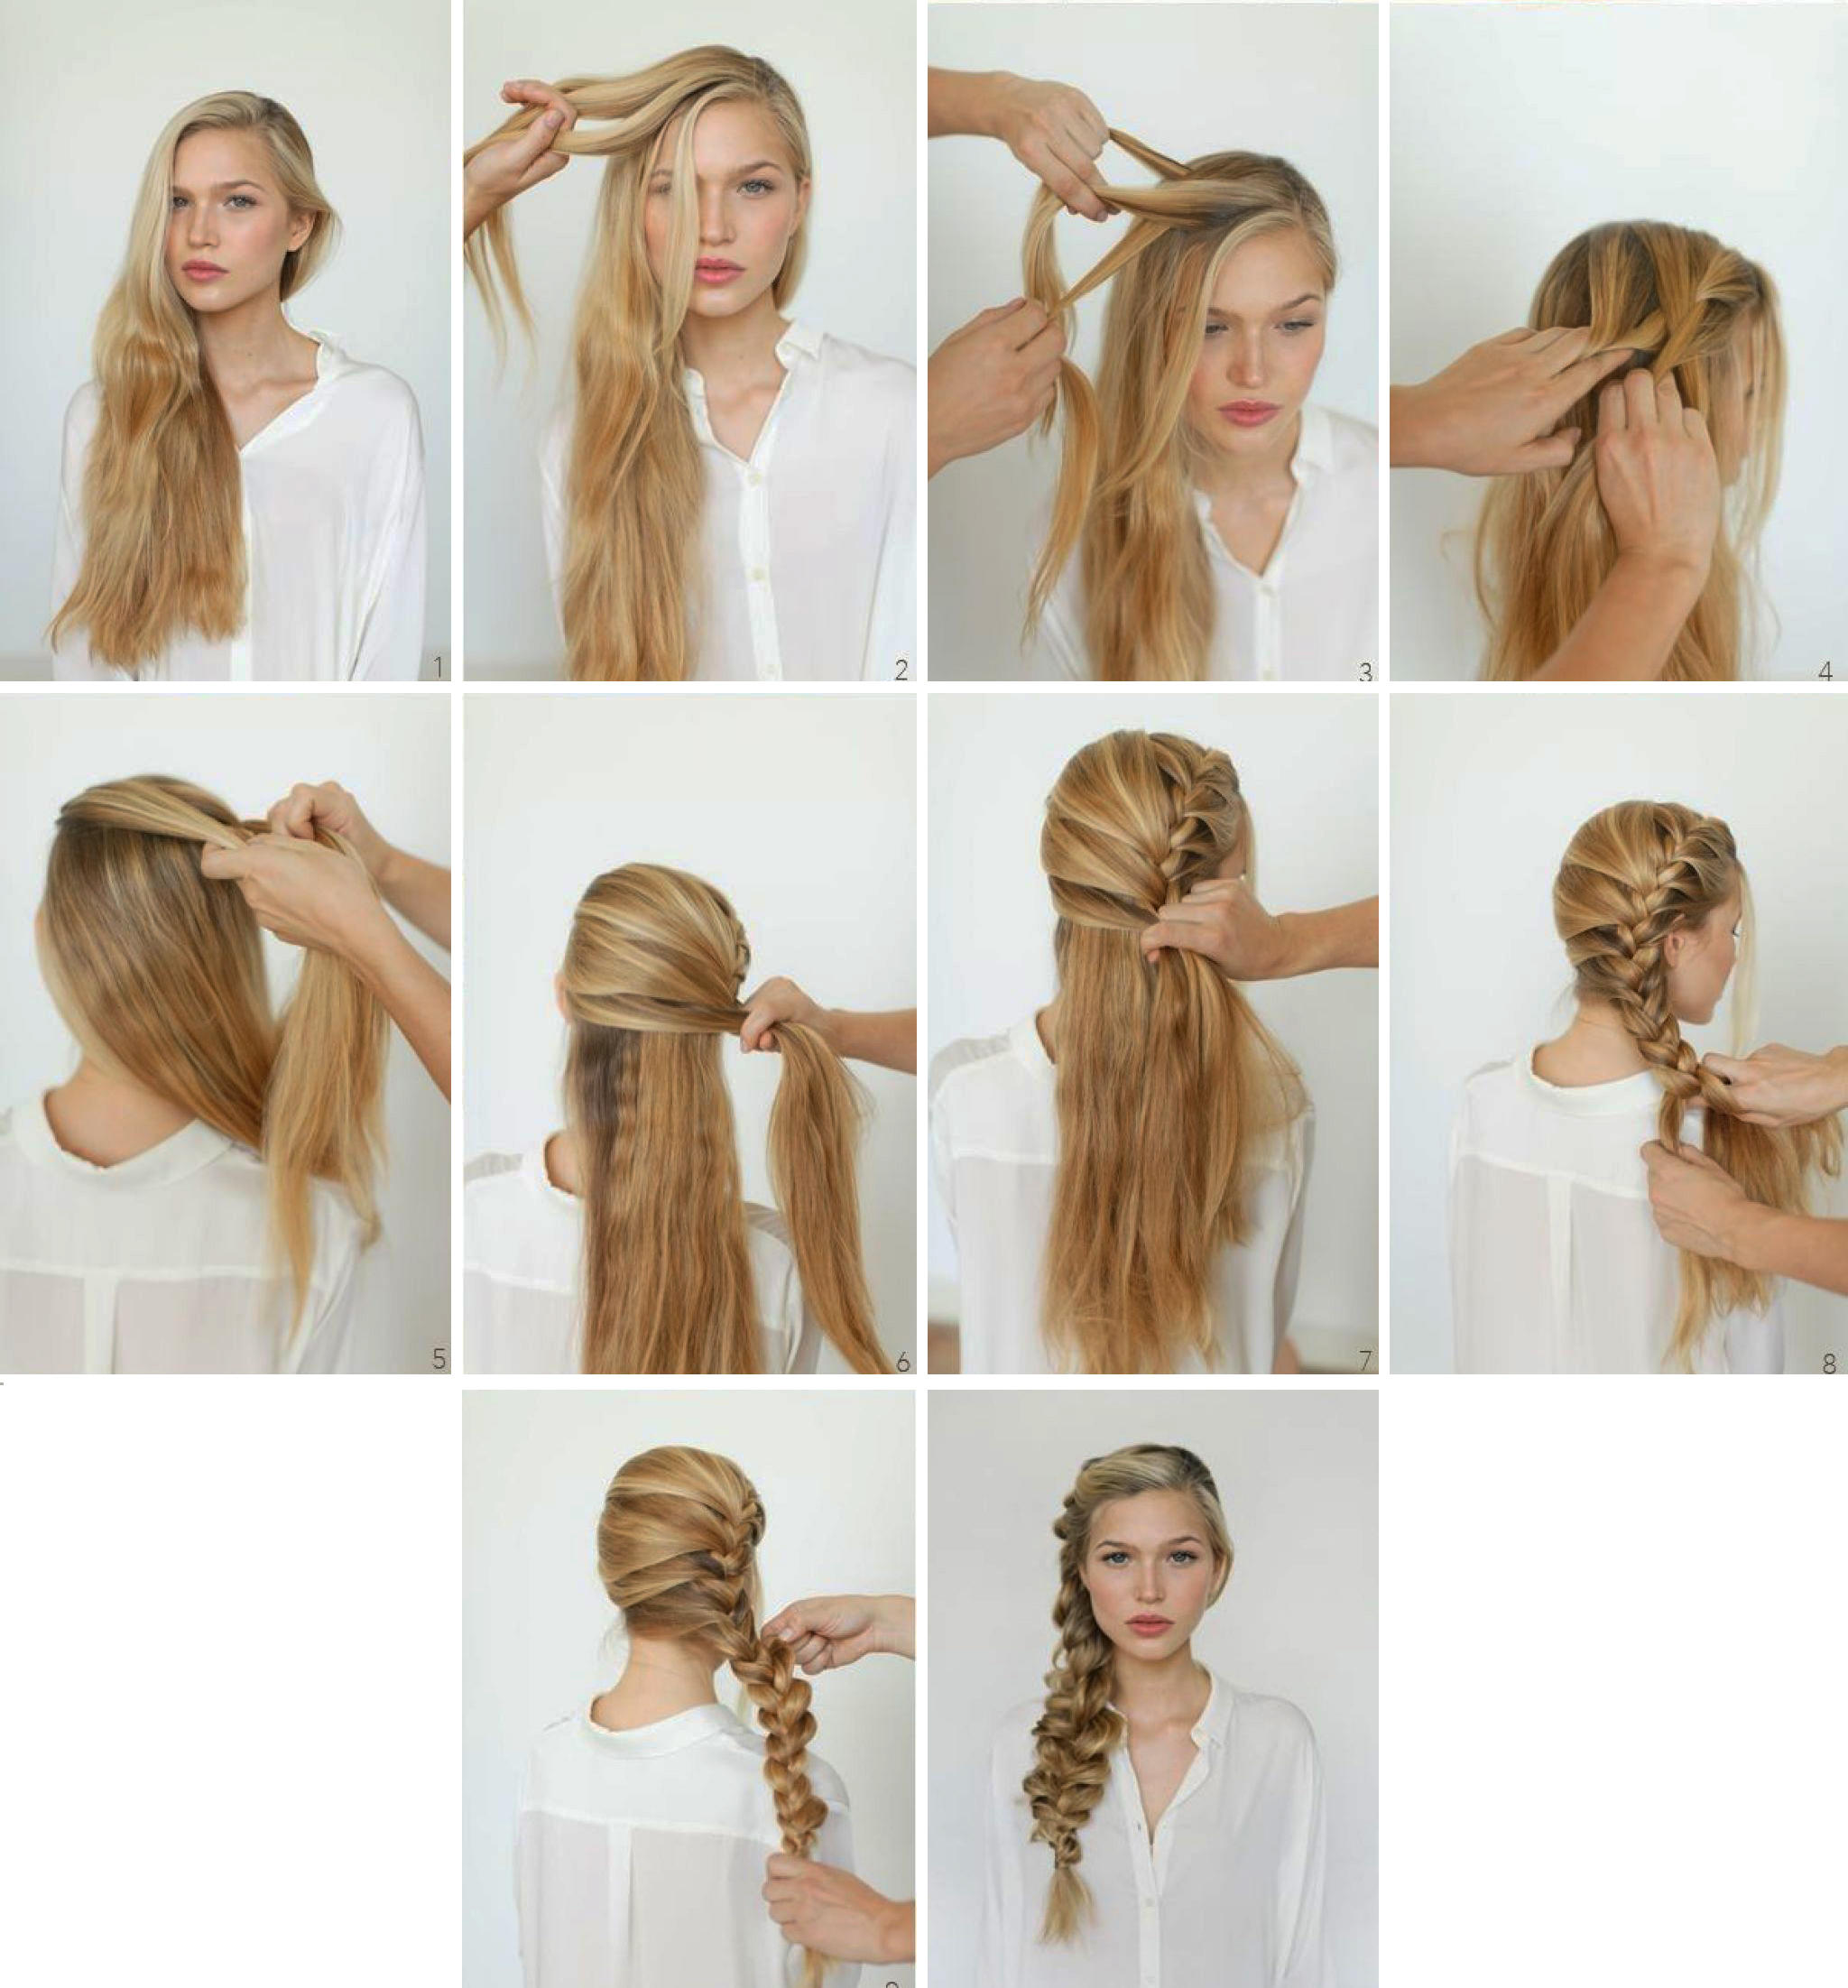
- Three-Strand Braid: The most basic. Divide a section into three strands, cross the right over the middle, then the left over the new middle, and repeat.
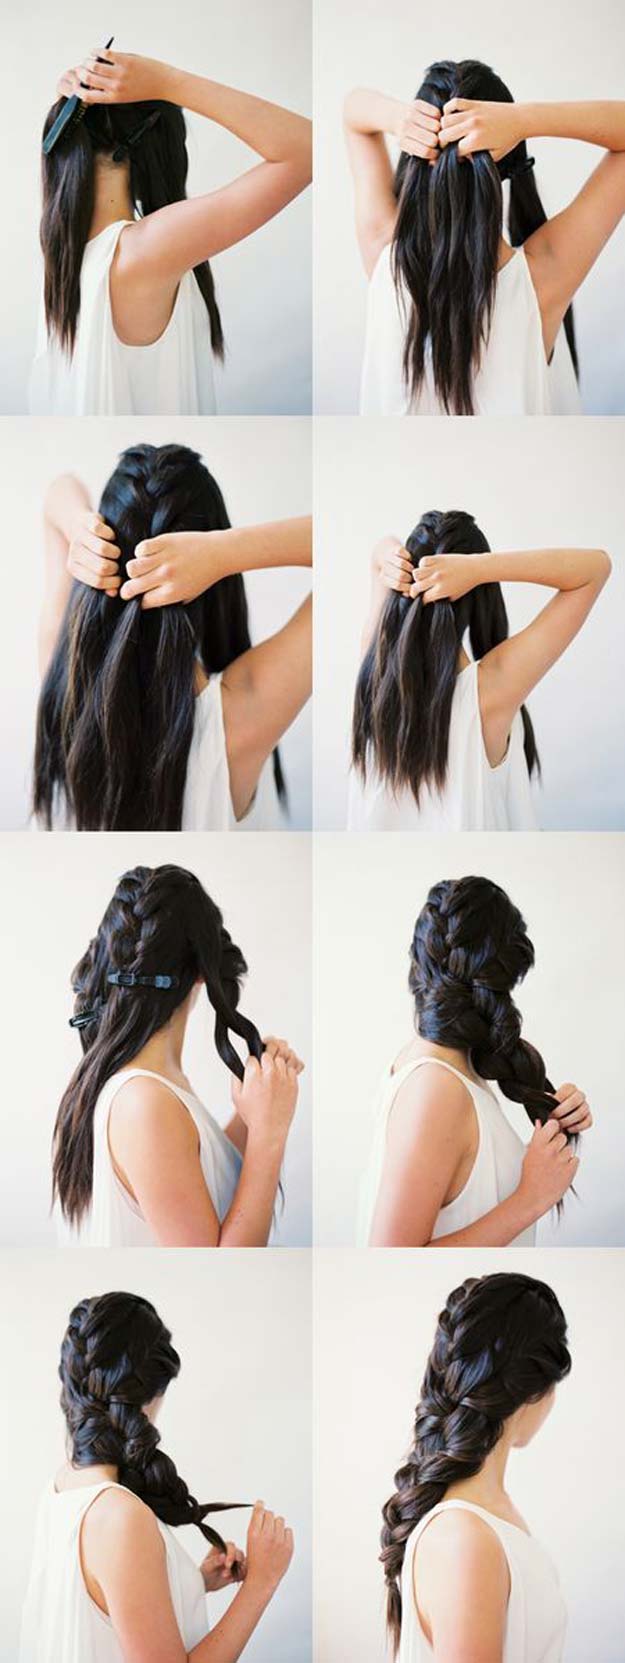
- French Braid (Concept): Start with three small sections at the crown. As you braid, incorporate new sections of hair from the sides into each strand before crossing it over.
- Dutch Braid (Concept): Similar to a French braid, but you cross the strands under the middle strand instead of over, making the braid stand out.
- Fishtail Braid (Concept): Divide hair into two sections. Take a small piece from the outer edge of one section and cross it over to join the inner edge of the other section. Repeat, alternating sides.
Tips for Success & Troubleshooting
Learning how to do hairstyle at home takes time and patience.
- Practice Makes Perfect: Don’t get discouraged if your first attempt isn’t flawless. Keep practicing!
- Patience is Key: Rushing through a style often leads to mistakes and frustration. Take your time.
- Start Simple: Master basic techniques and simple styles before attempting more complex ones.
- Use Multiple Mirrors: A hand mirror and a wall mirror can help you see the back of your head.
- Less is More with Products: Start with a small amount of product and add more if needed. Too much can weigh hair down or make it greasy.
- Prioritize Hair Health: Regular trims, deep conditioning treatments, and minimizing heat damage are essential for hair that styles well.
- Troubleshooting Common Issues:
- Frizz: Use a smoothing serum or leave-in conditioner on damp hair, and finish with a light hairspray.
- Flat Hair: Apply volumizing mousse or root lifter before blow-drying. Use dry shampoo at the roots on second-day hair.
- Curls Falling Out: Ensure hair is completely dry before curling. Use smaller sections, a higher heat setting (if safe for your hair), and a strong-hold hairspray. Let curls cool completely before touching.
- Tangles: Always detangle hair thoroughly before styling, especially before heat styling.
Conclusion
Learning how to do hairstyle at home is a rewarding journey that offers both practical benefits and a boost to your self-confidence. By understanding your hair, investing in the right tools, and practicing fundamental techniques, you can achieve a vast array of beautiful looks without stepping foot in a salon. Experiment with different styles, don’t be afraid to make mistakes, and most importantly, have fun with your hair. With every successful style, you’ll gain more skill, more confidence, and a greater appreciation for the power of a perfectly coiffed do.
